Picking the Perfect Sun shade
With hot temperatures, and the summer sun high in the sky almost 15 hours a day, sometimes you need a little more protection than your favorite sunglasses. In today’s post, we will break down the primary factors you should consider when selecting the perfect sun shade to match your favorite summer activities!
For starters, we thought up some standard measures that could be applied to all of the sun shade styles we will be discussing. We came up with 5 key measures to use, and everything will be rated on a 5-star scale with the exception of price.
- Frequency of Use: Ex daily, weekly, monthly, etc.
- Ground Composition: Ex sand, grass, concrete/ asphalt, etc.
- Elements Protection: Ex coverage from wind, rain, bugs, etc.
- Ease of Setup: Ex 1 person, attached to vehicle, etc.
- Price
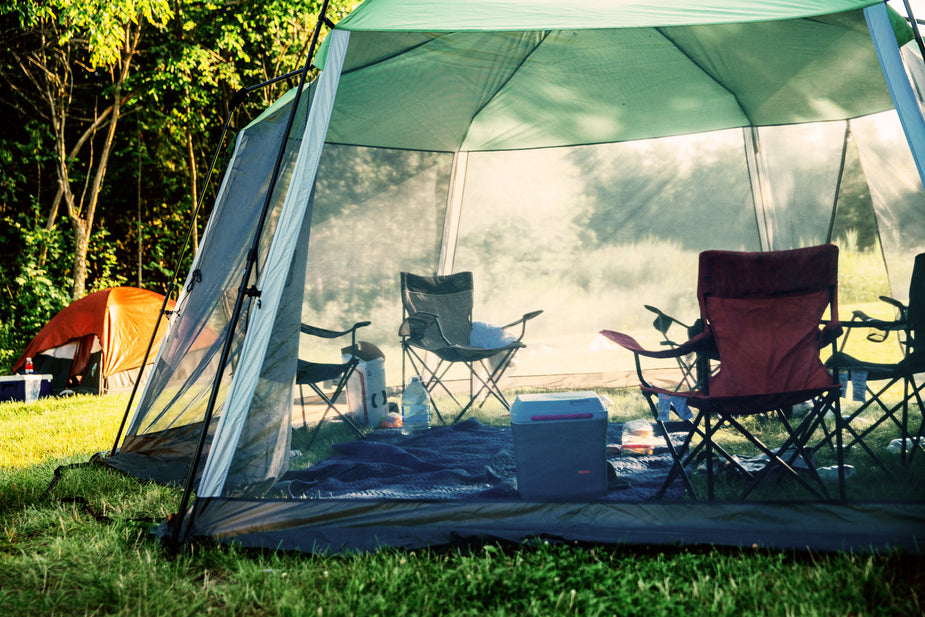
The Suburban Tailgater
Recommendation: The pop-up tent.
Easy to find, relatively inexpensive, and with multiple variations, pop-up tents are the first style of sun shade that comes to mind for most of us when this topic comes up. Here is how we would rate the pop-up based on our 5 elements above:
- Frequency: ✪✪✪✪ We would rate the pop up 5 stars if you use your sun shade frequently, primarily because they are relatively quick to set up and store. They are a bit bulky, however,
- Ground: ✪✪✪✪ Pop-up tents are good on solid surfaces like concrete, asphalt, and grass; however, they sometimes are a little bit less effective in sand especially if a leg gets buried too deeply. You can also be limited by wind on hard surfaces that you can’t stake into, and may need sandbags or water barrels to keep your tent down!
- Elements: ✪✪✪✪ Most pop-up tents are an ideal sun shade to protect you from other elements like light rain–and optional side walls can help a lot with wind as well. You will have to be careful with solid walls as they may catch heavy winds!
- Setup: ✪✪✪✪ Most 10’x10’ sun shades need two people to setup so the pair can walk apart on opposite corners–though some have a center “push” mechanism in the frame that makes it easier for 1 person.
- Price: $ - $$$. Many standard pop-up tents can be found for under $100, but the cheaper ones do tend to have tops that rip more easily, and frames prone to bending. If you use yours frequently, spending a bit more for a commercial frame, or thicker fabric material may make a big difference!
The Beach Bohemian
Recommendation: The Shibumi Shade©
Lightweight, compact, and super easy to set up even with one person, this breeze powered sun shade is perfect for those whose primary outdoor activities are on the coast!
- Frequency: ✪✪✪✪✪ Packs up to the size of a backpack with one long tent pole, and one fabric piece with a sandbag tether, this will save you tons of setup and breakdown time on the beach!
- Ground: ✪✪ Specifically designed for use on the sand, this is not good option for people who frequently use their sun shade on hard surfaces, or even grass as dirt/ mud would get stuck in the tent pole.
- Elements: ✪✪ This shade is primarily used for sun protection on clear days. With no sides, and the back of the shade taking shape based on wind power, you may find yourself getting wet in light rain storms. As long as the wind direction doesn’t change however, you will be good to go even with strong winds coming from the ocean!
- Setup: ✪✪✪✪✪ Super easy: just run your tent pole through the fabric, angle the front of the shadetowards the wind, and bury each end of the pole about 1-foot deep in the sand. Pull your sandbag tether to stand up straight and you are done!
- Price: $$$. With the mini starting at $190, and the full sized at $250, this is not the cheapest shade out there. That said, it is designed and manufactured in the US, and offers a high quality, convenient package!
The Professional Picnicker
Recommendation: The Mesh Shelter
They take a bit longer to set up, but can be great for longer camping trips, the backyard, or anywhere you want to avoid being eaten alive by BUGS! Lots of tent companies make excellent mesh shelters.
- Frequency: ✪✪ Mesh shelters setup much like a regular tent–and the larger they are, the more tricky they can be. Most use between 2-4 tent poles through the mesh structure; some also require additional poles for a rain fly. Recommend it if you don’t have to take it down every day.
- Ground: ✪✪✪✪✪ Most of these are freestanding shelters with the option to stake down the corners which means you can put them on almost any surface! On a calm day, they can just sit in the backyard or the driveway, and will just as easily sit on the beach with the corners secured.
- Elements: ✪✪✪✪ As these shelters are primarily mesh with solid “roof” areas, they are great to protect you from sun and bugs. The mesh will not help much during a hard rainstorm, but oftencan be removed if the bugs aren’t bad.
- Setup: ✪✪ Generally have multiple poles and panels. For those who are used to setting up a tent, it may not be too difficult–however if you are wanting to be done with setup in 2 minutes, a mesh shelter may not be the best option for you!
- Price: $$-$$$$. These tend to come from well-known tent manufacturers, so you do get what you pay for. They tend to have reinforced floors and corners, and other features that make them good for heavy use!
The Car Camper
Recommendation: A Fixed, Retractable Awning
If you don’t mind having a tent or shade attached to your vehicle’s roof rack, vehicle awnings are an awesome way to have sun protection for tailgating or camping right at your fingertips!
- Frequency: ✪✪✪✪✪ If you are frequently outdoors with your vehicle, you can’t beat having something attached to the roof! Just need a few seconds to open, and then you can go right to setting up underneath.
- Ground: ✪✪✪✪✪ Anywhere your vehicle goes, the tent can go! Most offer multiple ways of securing awning from poles to stake lines depending on where you are driving.
- Elements: ✪✪✪✪✪ You have lots of options when it comes to vehicle awnings, including sides, windows, and doors. As they are attached to and travel on your vehicle, many tend to be a heavy duty, waterproof canvas. As part of the awning will always be attached to your vehicle, you will have excellent resistance to windy days as long as your front supports are sturdy!
- Setup: ✪✪✪✪ Once attached to your roof rack (often a 2 person job), most vehicle awning systems can easily be operated by one person. We gave this 4 stars however because you willnot be able to use the awning away from your vehicle, and taking it off completely will also require help.
- Price: $$$-$$$$. Overland vehicle awnings, for example, tend to be expensive because they require hardware, need to be durable enough to ride on top of your vehicle, and are often made up of thick fabric. There are options that are not permanently attached to the vehicle, but these do not seem to be easier to use than a pop up tent or mesh shelter.
The Anytime, Anywhere Outsider
Recommendation: The Neso Shade©
Almost a cross between a pop-up tent and a Shibumi, the Neso shades are a compact option that provide flexible setup options, at a reasonable price. Size of a larger backpack due to poles and large pieces of fabric with anchor lines.
- Frequency: ✪✪✪✪ With one large square piece of fabric and 4 poles (2 each of different lengths), these are pretty easy to carry with you anywhere you want to go!
- Ground: ✪✪✪ Each corner must be filled with a heavy material like dirt, rocks, or sand. Theoretically youcan use it on concrete or Asphalt, however you would need to have something above to properly anchor the corners.
- Elements: ✪✪✪ With a large size available, you will get lots of great sun protection from the Neso. If windy you can use the lower poles to keep your shade closer to the ground to keep it from blowing over. You won’t get much help from rain however unless it is gentle and falling from directly above you.
- Setup: ✪✪✪ Most easily accomplished with 2 people working opposite corners, once you get the hang of setting up the Neso it goes pretty smoothly. In windy conditions it can be a bit difficult to know how much weight is needed in the corners, and we often fill our corner bags with sand AND bury them at the beach, for example!
- Price: $$-$$$. With smaller sizes starting right at $100, they aren’t quite as cheap as pop up tents but are much more portable. The materials used to make the Neso are durable, and should last a long time with regular use.
In conclusion, with lots of different styles, and each offering some pros and cons, you may want to experiment with one or more of these before deciding on the best sun shade for you. We would recommend keeping in mind how many people will be helping to set it up, how long you will be setting it up for, and whether or not you need any special features as certain options are more basic. As always, when you step out of them into the sunshine, don’t forget your SunHeists!